- 参考: 【十天自制软渲染器】DAY 03:画一个三角形(向量叉乘算法 & 重心坐标算法)
- 参考: Lesson 2: Triangle rasterization and back face culling
绘制三角形
扫描线填充算法
- 扫描线通过水平方向遍历每一行的像素,将在三角形内的像素进行填充来得到三角形.
- Step1 : 将三角形的三个定点按照y方向进行排序.
- 做完这步后,我们可以确定$t_{0}t_{2}$为最长边,而$t_{1}$将三角形在竖直方向划分为两部分
// sort the vertices, t0, t1, t2 lower−to−upper (bubblesort yay!)
if (t0.y>t1.y) std::swap(t0, t1);
if (t0.y>t2.y) std::swap(t0, t2);
if (t1.y>t2.y) std::swap(t1, t2);
- 做完这步后,我们可以确定$t_{0}t_{2}$为最长边,而$t_{1}$将三角形在竖直方向划分为两部分
- Step 2:如图对于红色的最长边我们可以一次画完,但对于绿色部分,我们只能拆成两个部分.
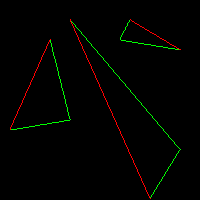
- Step 3:每次通过计算水平上的三角形的两端点,并且填充内部像素来绘制三角形
void triangle(Vec2i t0, Vec2i t1, Vec2i t2, TGAImage &image, TGAColor color) {
    //保证能构成三角形
    if (t0.y==t1.y && t0.y==t2.y) return;

    //排序保证t0,t1,t2的相对位置
    if (t0.y>t1.y) std::swap(t0, t1);
    if (t0.y>t2.y) std::swap(t0, t2);
    if (t1.y>t2.y) std::swap(t1, t2);

    //计算y方向的需遍历的像素个数
    int total_height = t2.y-t0.y;

    //扫描线填充法
    for (int i=0; i<total_height; i++) {
        // 是否是上半部分或者没有上下两部分
        bool second_half = i>t1.y-t0.y || t1.y==t0.y;
        int segment_height = second_half ? t2.y-t1.y : t1.y-t0.y;
        float alpha = (float)i/total_height;
        float beta  = (float)(i-(second_half ? t1.y-t0.y : 0))/segment_height; // be careful: with above conditions no division by zero here
        Vec2i A =               t0 + (t2-t0)*alpha;
        Vec2i B = second_half ? t1 + (t2-t1)*beta : t0 + (t1-t0)*beta;
        if (A.x>B.x) std::swap(A, B);
        for (int j=A.x; j<=B.x; j++) {
            image.set(j, t0.y+i, color); // attention, due to int casts t0.y+i != A.y
        }
    }
}
- 扫描线法的缺点
- 设计场景是单线程CPU
包围盒和三角形内部判断
向量叉乘判断法
- 具体见Games101笔记
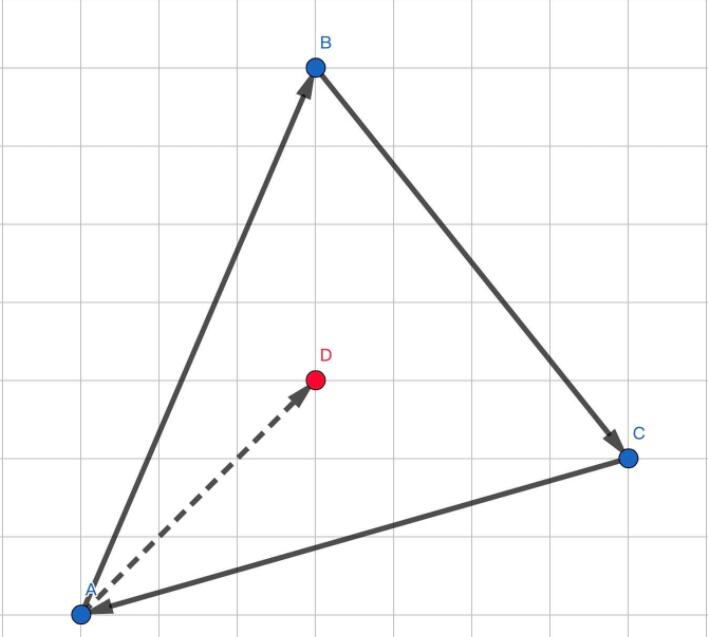
- 通过叉乘可以判断两个向量的相对位置.因此我们可以将待判断的某一点与三角形的三个定点连接.如图:
- 此时我们只需判断$\vec{AD}$和$\vec{AB}$,$\vec{BD}$和$\vec{BC}$,$\vec{CD}$和$\vec{CA}$中含有点D的向量的相对位置.
- 如果对应向量全在另外一条向量的同一层,则改点在三角形内部.否则在三角形外部.
// 利用叉乘判断是否在三角形内部
Vec3i crossProduct(Vec2i *pts, Vec2i P) {
    // 构建出三角形 ABC 三条边的向量
    Vec2i AB(pts[1].x - pts[0].x, pts[1].y - pts[0].y);
    Vec2i BC(pts[2].x - pts[1].x, pts[2].y - pts[1].y);
    Vec2i CA(pts[0].x - pts[2].x, pts[0].y - pts[2].y);

    // 三角形三个顶点和 P 链接形成的向量
    Vec2i AP(P.x - pts[0].x, P.y - pts[0].y);
    Vec2i BP(P.x - pts[1].x, P.y - pts[1].y);
    Vec2i CP(P.x - pts[2].x, P.y - pts[2].y);

    return Vec3i(AB^AP, BC^BP, CA^CP);
}
重心坐标表示方法
设$\triangle ABC$平面内有一点P,则$\vec{AP}$可以使用$\vec{AB}$和$\vec{AC}$线性表示:
进行如下变换:
- u,v,(1-u-v)与点p的关系如下:
- 当三个分量均大于 0 小于 1 时,P 位于三角形内部
- 有一个分量等于 0 时,P 在三角形边上
- 有两个变量等于 0 时,P 在某个顶点上
- 否则在三角形外
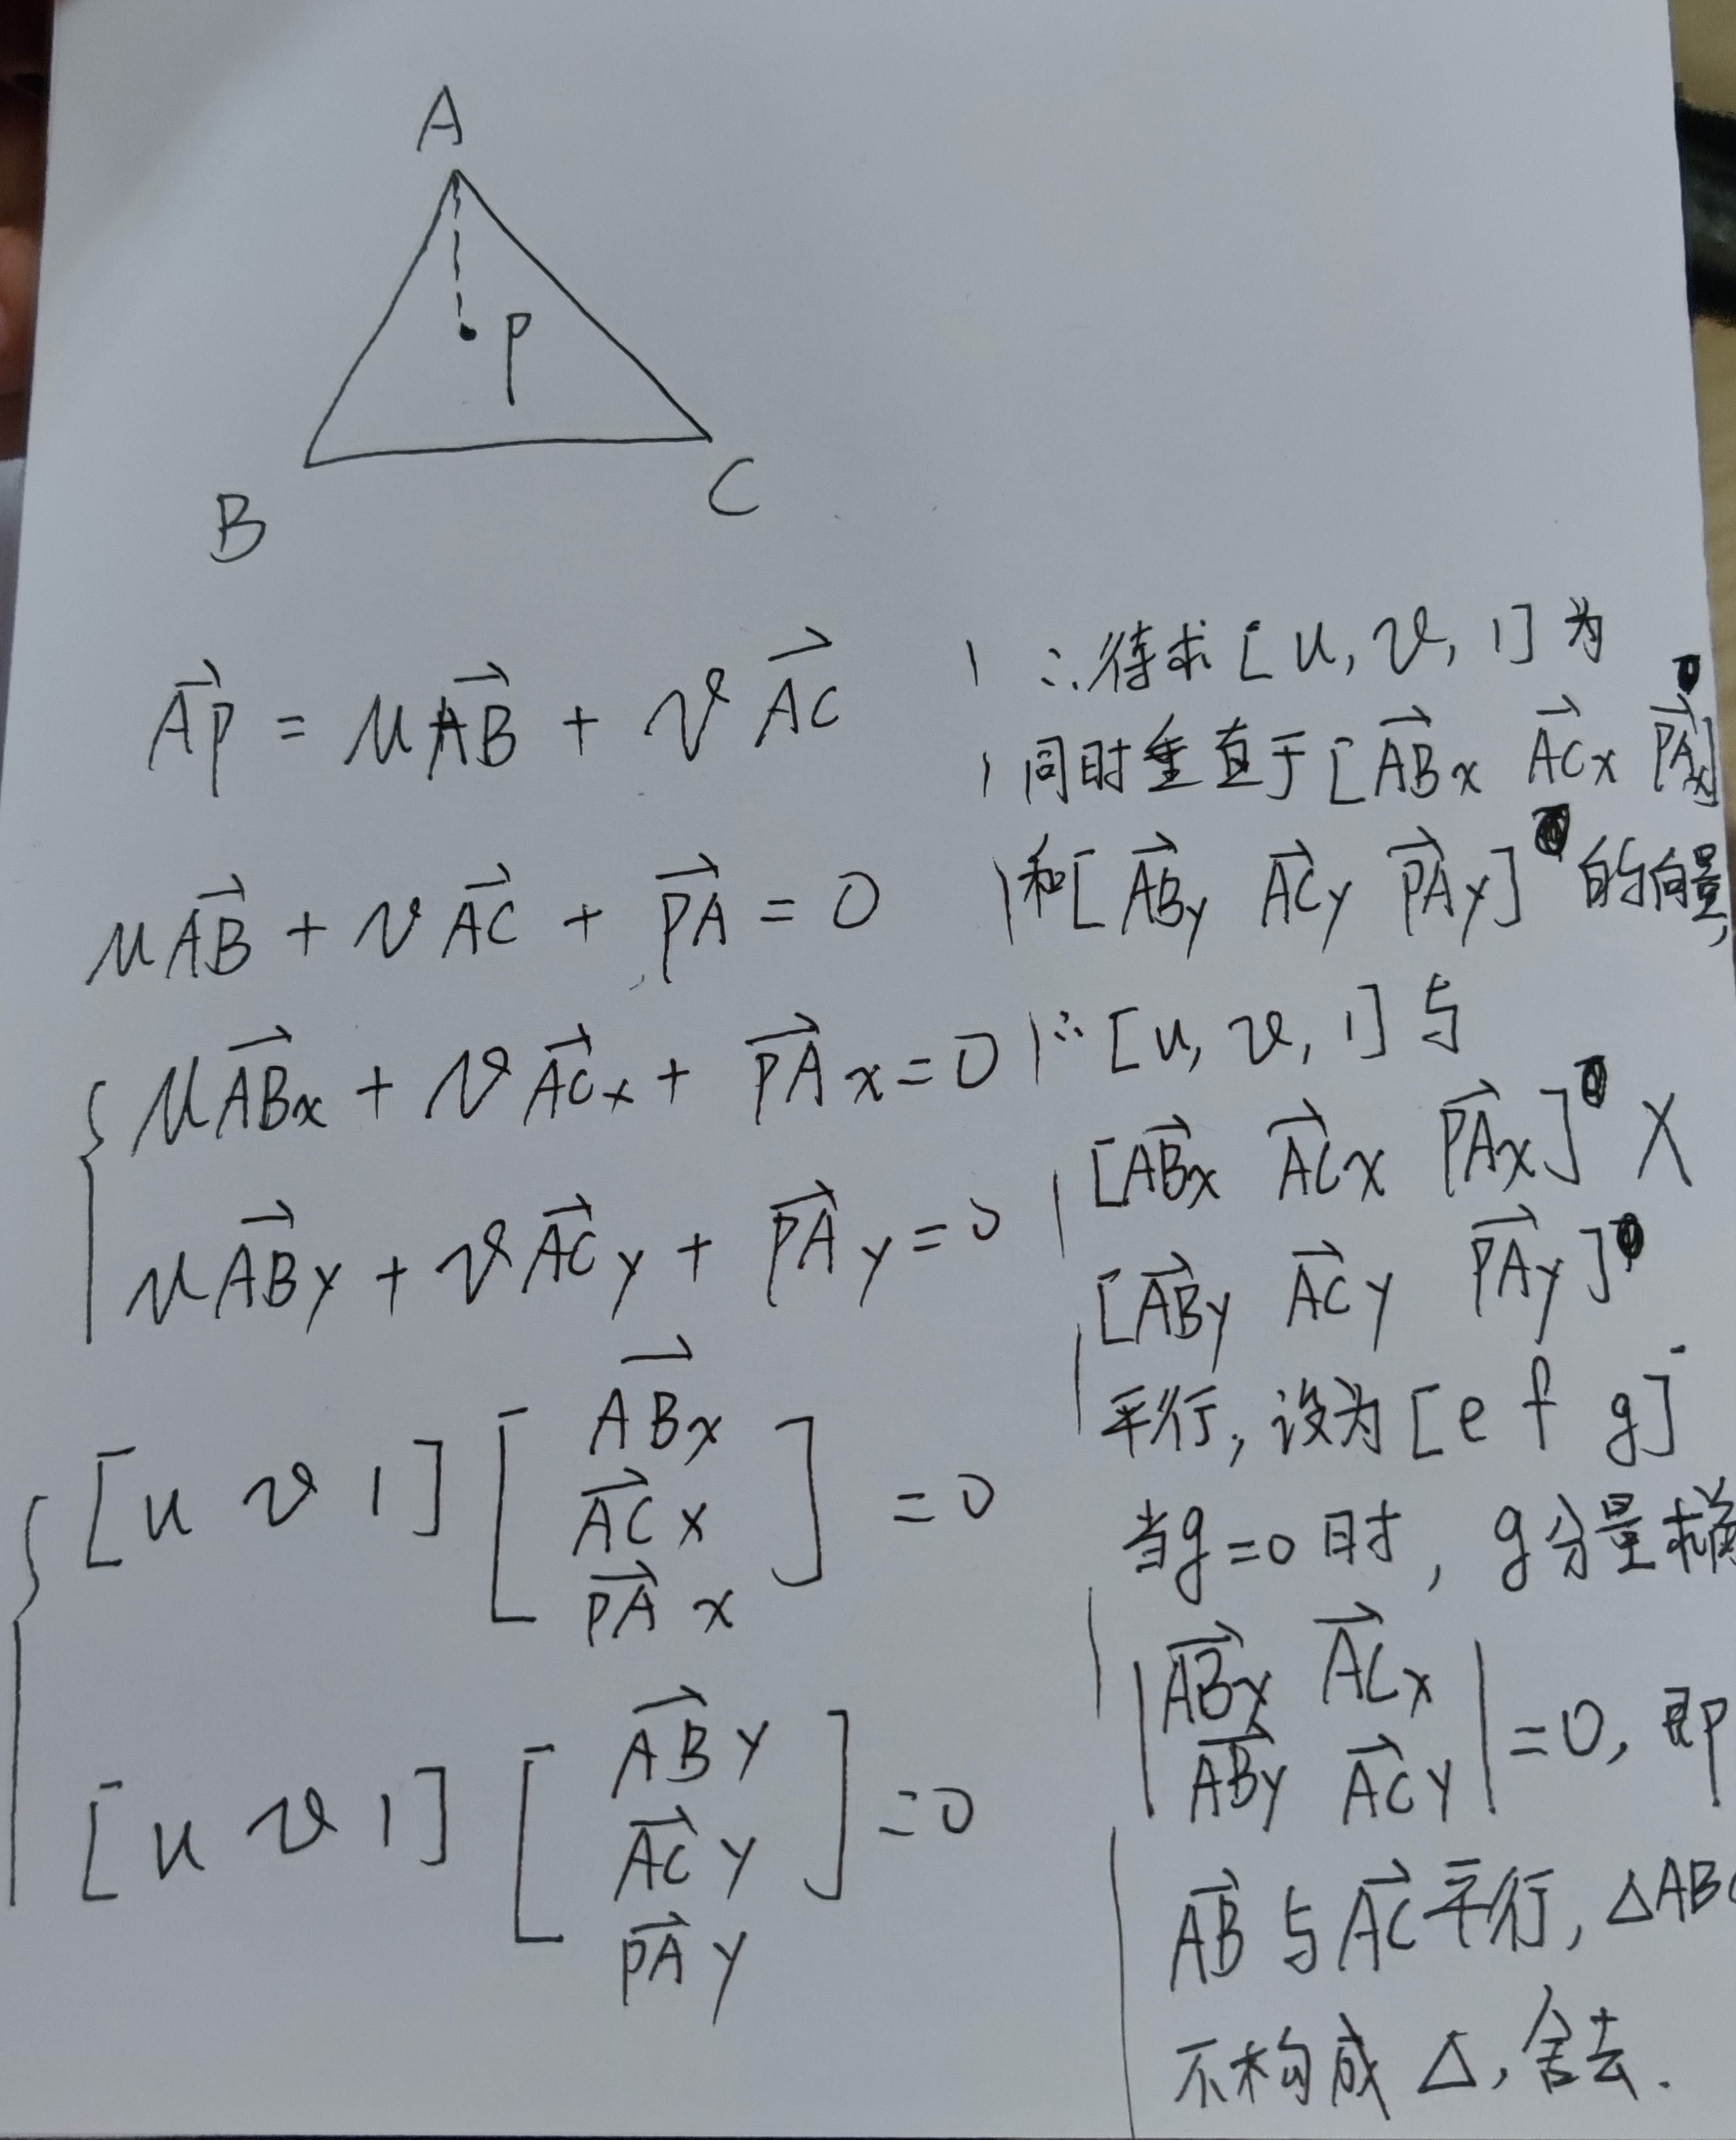
- 最后判断 [u/g v/g g/g]中的符号的范围,即可判断点p的位置.
Vec3f  barycentric(Vec2i *pts, Vec2i P) {
    Vec2f AB(pts[1].x-pts[0].x,pts[1].y - pts[0].y);
    Vec2f AC(pts[2].x-pts[0].x,pts[2].y - pts[0].y);
    Vec2f PA(pts[0].x-P.x,pts[0].y-P.y);
    Vec3f u =Vec3f(AB.x,AC.x,PA.x)^Vec3f(AB.y,AC.y,PA.y);

    if(std::abs(u.z) < 1)
        return Vec3f(-1,1,1);

    u.x /= u.z;
    u.y /= u.z;
    u.z /= u.z;
    return Vec3f(1-u.x-u.y,u.x,u.y);
}


void triangle(Vec2i t0, Vec2i t1, Vec2i t2, TGAImage &image, TGAColor color) {
    int minXVal = min(t0.x,min(t1.x,t2.x));
    int maxXVal = max(t0.x,max(t1.x,t2.x));
    int minYVal = min(t0.y,min(t1.y,t2.y));
    int maxYVal = max(t0.y,max(t1.y,t2.y));

    for(int i = minXVal; i <= maxXVal; ++i)
    {
        for(int j = minYVal; j <= maxYVal; ++j)
        {
            Vec2i pts[] = {t0,t1,t2};
            Vec3f u = barycentric(pts,Vec2i(i,j));
            if(u.x > 0 && u.y > 0 && u.z > 0)
            {
                image.set(i,j,color);
            }
        }
    }
}
Flat shading render
- 详细看games101笔记
- 着色频率
- Flat shading
- 逐多边形
- 高洛德shading
- 逐定点
- Phong shading
- 逐像素
- Flat shading
- Blinn-Phong Reflectance Model
- Diffuse Reflection
- Specular
- Ambient
int main(int argc, char** argv) {
    if (2==argc) {
        model = new Model(argv[1]);
    } else {
        model = new Model("obj/african_head.obj");
    }

    TGAImage image(width, height, TGAImage::RGB);
    Vec3f light_dir(0,0,-1);
    for (int i=0; i<model->nfaces(); i++) {
        std::vector<int> face = model->face(i);
        Vec2i screen_coords[3];
        Vec3f world_coords[3];
        for (int j=0; j<3; j++) {
            Vec3f v = model->vert(face[j]);
            screen_coords[j] = Vec2i((v.x+1.)*width/2., (v.y+1.)*height/2.);
            world_coords[j]  = v;
        }
        Vec3f n = (world_coords[2]-world_coords[0])^(world_coords[1]-world_coords[0]);
        n.normalize();
        float intensity = n*light_dir;
        if (intensity>0) {
            triangle(screen_coords[0], screen_coords[1], screen_coords[2], image, TGAColor(intensity*255, intensity*255, intensity*255, 255));
        }
    }

    image.flip_vertically(); // i want to have the origin at the left bottom corner of the image
    image.write_tga_file("output.tga");
    delete model;
    return 0;
}